
[Paper Review] StarGAN: Unified Generative Adversarial Networks for Multi-Domain Image-to-Image Translation 논문 분석
업데이트:
✍🏻 이번 포스팅에서는 하나의 Generator와 discriminator로 다양한 dataset에 대해 image-to-image translation을 하는 starGAN model에 대해 살펴본다.
-
Paper : StarGAN: Unified Generative Adversarial Networks for Multi-Domain Image-to-Image Translation (CVPR 2018) / Yunjey Choi, Minje Choi, Munyoung Kim, Jung-Woo Ha, Sunghun Kim, Jaegul Choo)
2개 이상의 domain을 다루는 image-to-image translation 연구들은 scalability와 robustness에 한계가 있었다. StarGAN은 이를 개선하여 single network로 Multi-Domain에 대해 이미지 변환을 가능하게 했다. StarGAN은 flexible하고 scalable하다는 장점이 있다.
1. Introduction

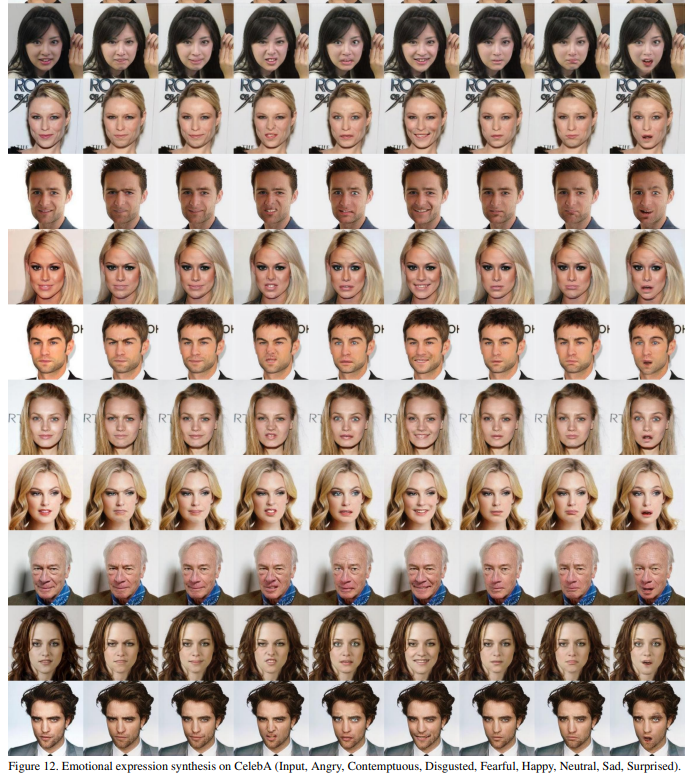
본 논문의 대표적인 task는 CelebA와 RaFD dataset을 이용하여 얼굴의 특징과 표정을 변화 시키는 것이다.
Using Dataset
- CelebA : 40개의 label (머리색, 성별, 나이 등의 facial attribute와 관련된 정보)
- RaFD : 8개의 label(happy, sad, angry 등의 facial expression와 관련된 정보)
Exsiting Model : Cross-domain model

StarGAN에서는 single generator를 사용해서 다양한 domain을 mapping한다. : ⭐Star 모양⭐
기존의 연구들은 다양한 domain에 대해 image translation 하는 것이 매우 비효율적이었다.
Figure2의 (a)처럼 multi-domain을 학습할 때, 각각의 generator들은 전체의 data를 활용하지 못하고 2개의 domain만을 사용할 수 있었다. 또한, 다양한 dataset의 domain들을 결합하여 훈련시키는 것이 어려웠다. (k개의 domain을 학습시키려면 k(k-1)의 generator가 필요)
StarGAN은 기존 모델의 문제점(Fixed translation)을 개선하였다.
- StarGAN은 하나의 generator만으로도 다양한 domain들을 mappping 할 수 있으므로 효율적인 학습이 가능하다.
- 모든 domain의 정보(label)들을 control할 수 있도록 mask vector를 사용한다.
2. Related Work
Generated Adversarial Networks
Conditionals GANs
- [CGAN] Conditional Generative Adversarial Nets (2014) : Review
- Generative Adversarial Text to Image Synthesis (2016) : Review
Image-to-Image Translation
- [Pix2Pix] Image-to-Image Translation with Conditional Adversarial Networks (CVPR 2017) : Review
- [SPADE] Semantic Image Synthesis with Spatially Adaptive Normalization (CVPR 2019) : Review
- [CycleGAN] Unpaired Image-to-Image Translation using Cycle-Consistent Adversarial Networks(ICCV 2017) : Review
- CoGAN
- DiscoGAN
기존의 연구는 2가지의 domain에 대한 관계를 찾았다면, stargan에서는 이를 확장해 multi-domain에 대해서도 이미지 변환 task를 할 수 있도록 한다.
3. Star Generative Adversarial Networks
3.1 Multi-Domain Image-to-Image Translation
⭐Our goal is to train a single generator G that learns mappings among multiple domains.

- Generator는 target domain label $c$와 input $x$을 이용해서 output image를 생성한다.
\(c, G(x, c) \rightarrow y\)
- input image에서 다른 image를 flexible하게 생성할 수 있도록, target domain label $c$는 random으로 생성한다.
class Generator(nn.Module): """Generator network.""" def __init__(self, conv_dim=64, c_dim=5, repeat_num=6): super(Generator, self).__init__() layers = [] layers.append(nn.Conv2d(3+c_dim, conv_dim, kernel_size=7, stride=1, padding=3, bias=False)) layers.append(nn.InstanceNorm2d(conv_dim, affine=True, track_running_stats=True)) layers.append(nn.ReLU(inplace=True)) # Down-sampling layers. curr_dim = conv_dim for i in range(2): layers.append(nn.Conv2d(curr_dim, curr_dim*2, kernel_size=4, stride=2, padding=1, bias=False)) layers.append(nn.InstanceNorm2d(curr_dim*2, affine=True, track_running_stats=True)) layers.append(nn.ReLU(inplace=True)) curr_dim = curr_dim * 2 # Bottleneck layers. for i in range(repeat_num): layers.append(ResidualBlock(dim_in=curr_dim, dim_out=curr_dim)) # Up-sampling layers. for i in range(2): layers.append(nn.ConvTranspose2d(curr_dim, curr_dim//2, kernel_size=4, stride=2, padding=1, bias=False)) layers.append(nn.InstanceNorm2d(curr_dim//2, affine=True, track_running_stats=True)) layers.append(nn.ReLU(inplace=True)) curr_dim = curr_dim // 2 layers.append(nn.Conv2d(curr_dim, 3, kernel_size=7, stride=1, padding=3, bias=False)) layers.append(nn.Tanh()) self.main = nn.Sequential(*layers) def forward(self, x, c): # Replicate spatially and concatenate domain information. # Note that this type of label conditioning does not work at all if we use reflection padding in Conv2d. # This is because instance normalization ignores the shifting (or bias) effect. c = c.view(c.size(0), c.size(1), 1, 1) c = c.repeat(1, 1, x.size(2), x.size(3)) x = torch.cat([x, c], dim=1) return self.main(x) - Discriminator는 ACGAN과 유사하게 Auxiliary Classifier을 사용한다.
- Auxiliary classifier는 하나의 discriminator로 여러 domain을 control한다.
- Discriminator는
source와domain label에 대한 확률분포를 생성한다.
class Discriminator(nn.Module):
    """Discriminator network with PatchGAN."""
    def __init__(self, image_size=128, conv_dim=64, c_dim=5, repeat_num=6):
        super(Discriminator, self).__init__()
        layers = []
        layers.append(nn.Conv2d(3, conv_dim, kernel_size=4, stride=2, padding=1))
        layers.append(nn.LeakyReLU(0.01))

        curr_dim = conv_dim
        for i in range(1, repeat_num):
            layers.append(nn.Conv2d(curr_dim, curr_dim*2, kernel_size=4, stride=2, padding=1))
            layers.append(nn.LeakyReLU(0.01))
            curr_dim = curr_dim * 2

        kernel_size = int(image_size / np.power(2, repeat_num))
        self.main = nn.Sequential(*layers)
        self.conv1 = nn.Conv2d(curr_dim, 1, kernel_size=3, stride=1, padding=1, bias=False)
        self.conv2 = nn.Conv2d(curr_dim, c_dim, kernel_size=kernel_size, bias=False)

    def forward(self, x):
        h = self.main(x)
        out_src = self.conv1(h)
        out_cls = self.conv2(h)
        return out_src, out_cls.view(out_cls.size(0), out_cls.size(1))
Adversarial Loss
- G는 아래의 object function을 minimize하는 방향으로, D는 maximize하는 방향으로 학습한다. (1)
Domain Classification Loss
StarGAN의 목표는 target domain label $c$에 따라 $x$에서 $y$로 이미지를 생성하는 것이다. 이를 위해 D의 최상단에 auxiliary classifier를 추가하여 domain classification loss에 대해서도 학습하도록 하였다.
(1) Domain Classification Loss of Real image
- original domain $c’$에 따라 real image $x$를 분류하도록 훈련한다. (2)
(2) Domain Classification Loss of Fake image
- G는 target domain $c$에 따라 이미지를 생성하도록 이 loss function을 minimize하는 방향으로 훈련한다. (3)
(3) Code
  # Original-to-target domain.
  x_fake = self.G(x_real, c_trg)
  out_src, out_cls = self.D(x_fake)
  g_loss_fake = - torch.mean(out_src)
  g_loss_cls = self.classification_loss(out_cls, label_trg, self.dataset)
Reconstruction Loss
(1), (3)의 두 loss를 사용하면 그럴싸한 이미지를 생성할 수는 있겠지만, domain을 변화시키면서 attribute를 변화시킬 때 input image의 content가 훼손될 수도 있다. 특성을 변화시킬 때 원본 이미지의 특성이 남아있도록 CycleGAN에서 사용한 cycle-consistency loss를 사용한다.
Cycle-Consistency Loss
\[\mathcal{L}_{r e c}=\mathbb{E}_{x, c, c^{\prime}}\left[\left\|x-G\left(G(x, c), c^{\prime}\right)\right\|_{1}\right]\]- where G takes in the translated image $G(x, c)$ and the original domain label $c’$ as input and tries to reconstruct the original image $x$
- L1 norm
x_reconst = self.G(x_fake, c_org)
g_loss_rec = torch.mean(torch.abs(x_real - x_reconst))
Full Objective
\[\begin{array}{c} \mathcal{L}_{D}=-\mathcal{L}_{a d v}+\lambda_{c l s} \mathcal{L}_{c l s}^{r}, \\ \mathcal{L}_{G}=\mathcal{L}_{a d v}+\lambda_{c l s} \mathcal{L}_{c l s}^{f}+\lambda_{r e c} \mathcal{L}_{r e c} \end{array}\]- $\lambda_{c l s}$와 $\lambda_{r e c}$는 hyper-parameter로, domain classification과 reconstruction loss의 상대적인 중요도를 나타낸다.
- 본 논문의 실험에서는 $\lambda_{c l s} = 1$, $\lambda_{r e c} = 10$을 사용하였다.
- 이 부분 역시 CycleGAN과 유사
# Backward and optimize.
g_loss = g_loss_fake + self.lambda_rec * g_loss_rec + self.lambda_cls * g_loss_cls
3.2 Training with Multiple Datasets
starGAN은 서로 다른 domain을 가진 dataset을 통합할 수 있다.
- ex) CelebA의 머리색 label을 RaFD dataset에 적용할 수 있음
그러나 다수의 dataset을 학습시킬 때, 원하는 label에 대한 정보는 일부 dataset에만 존재하기 때문에 사진을 복원하는 과정에서 문제가 생긴다. \(\mathcal{L}_{r e c}=\mathbb{E}_{x, c, c^{\prime}}\left[\left\|x-G\left(G(x, c), c^{\prime}\right)\right\|_{1}\right]\) 의 식에서 $G(x, c)$로부터 input image $x$를 복원하려면 $c’$의 label vector가 필요한데 이 label이 없는 것이다.
(CelebA의 얼굴을 웃는 표정을 변화시킨 후 다시 이를 슬픈 표정으로 복원시키려고 할 때, 기존의 CelebA dataset은 머리색, 주근깨 등의 label만 있으므로 슬픈얼굴 $c’$에 대해 복원하기가 어려움)
Mask Vector
따라서 이를 위해 Mask vector $m$을 도입하여 잘모르는 label에 대해서는 무시하도록 하였다. (one-hot vector에서 0으로) mask vector를 이용하여 학습을 하면 특정 dataset의 잘 알려진 label에 대해서만 학습을 할 수 있다.
\[\tilde{c}=\left[c_{1}, \ldots, c_{n}, m\right]\]Ex) CelebA의 이미지를 training할 때, discriminator는 celebA와 관련된 특성들(머리색, 주근깨 등등)에 대한 classification error만을 최소화하도록 학습을 한다. (RaFD의 특성-표정에 관해서는 학습을 안함)
⭐ Training Strategy
Discriminator는 CelebA와 RaFD를 번갈아가며 학습을 해서 두 dataset의 feature들을 골고루 학습하도록 한다. 반면, Generator는 모든 dataset에 대한 label을 제어하도록 학습한다.
4. Implementation
Improved GAN Training
학습을 안정화하고, 더 좋은 quality의 이미지를 만들기 위해 gradient penalty($\lambda_{g p}=10$)와 Wasserstein GAN의 objective function을 사용하였다.
\[\begin{aligned} \mathcal{L}_{a d v}=& \mathbb{E}_{x}\left[D_{s r c}(x)\right]-\mathbb{E}_{x, c}\left[D_{s r c}(G(x, c))\right] \\ &-\lambda_{g p} \mathbb{E}_{\hat{x}}\left[\left(\left\|\nabla_{\hat{x}} D_{s r c}(\hat{x})\right\|_{2}-1\right)^{2}\right] \end{aligned}\]Network Architecture
CycleGAN의 architecture를 baseline으로 사용한다.
- 2개의 convolutional layers로 구성된 generator network
- stride size of 2 for downsampling
- 6 residual blocks
- 2 transposed convolutional layers with the stride size of 2 for upsampling.
- G만 instance normalization (D는 X)
5. Experiment Results


기존의 cross-domain model들은 fixed translation을 하기 때문에 overfitting이 되기 쉽다. 반면, starGAN은 유연하게 변환을 할 수 있기 때문에 보다 화질도 더 좋고 특성들의 적용이 잘된다.
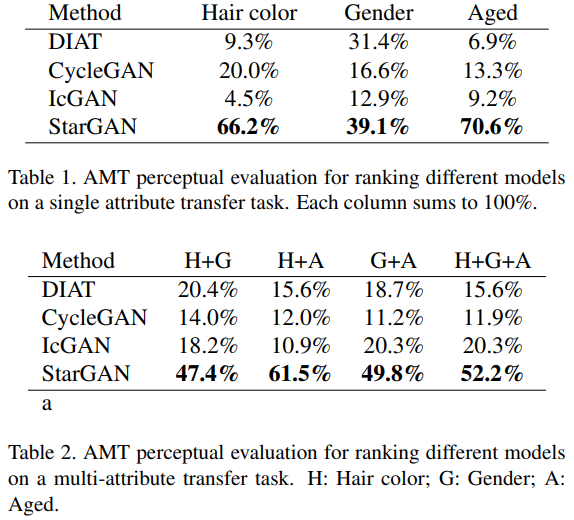
Amazon Mechanical Turk (AMT)를 통해 실제 user들에게 평가를 받아봤는데 starGAN이 제일 좋은 결과를 받았다.
CelebA + RaFD

하나의 dataset만을 사용한 StarGAN-SNG은 회색 배경과 blury한 이미지가 나타나지만, dataset을 섞은 StarGAN-JNT는 high visual quality의 이미지가 생성되었다.
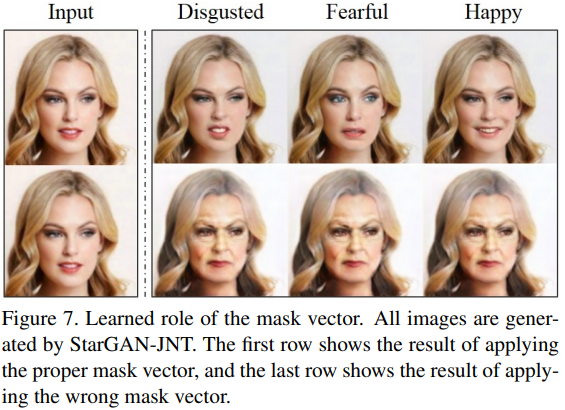
mask vector를 사용해야 잘 알고있는 attribute에 대해서만 학습이 되므로 mask vector를 사용한 사진이 퀄리티가 괜찮다.
6. Conclusion
✍🏻 StarGAN은 하나의 Generator와 discriminator만으로도 다양한 dataset에 대해 image-to-image translation을 가능하게 해주는 효과적인 모델이다. Scalablity하다는 장점이 있으며, 기존의 모델에 비해 high visual quality의 이미지를 생성한다.
7. Opinions
기존에 공부했던 논문들의 집약체? 같았던 논문이다. 다양한 도메인에 대해 어떤 식으로 학습을 진행하는지 알 수 있어서 좋았다. 실제로 코딩을 통해 실험을 해봐야겠다 😚
(2021.04.30 추가)
- starGAN v1의 공식 repo의 코드를 기반으로 학습을 시켜보았다.(celebA single dataset)
 |
 |
학습이 진행될수록 image-to-image translation이 잘됨을 확인할 수 있다.
댓글남기기